how-to etiketine sahip kayıtlar gösteriliyor. Tüm kayıtları göster

19 Mart 2019 Salı

Transitions: A How-To

Transitions: A How-To

Did you know the little metal or wood strip that joins two different types of flooring is called a transition? Neither did I until started looking for one for the Brick House. I always thought they were called thresholds, but that is the name for exterior doorways.
You never know what mind bender an old house will throw at you! It might be how to fix electrical so it will be functional or it might be dodgy plumbing that can't be fixed without tearing down the house or it might be something simple like a too tall layer of tile.

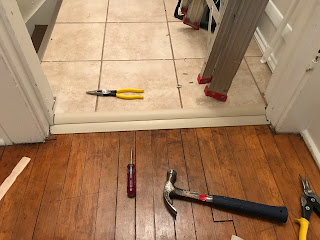
 Most transition strips are made for a half inch difference in floor heights. The kitchen floor tile was laid on top of a layer of cement board (a good thing) which is on top of a layer of thin plywood and all that is on top of the original wood floors! That makes the total difference between the tile kitchen floor and the dining room a little shy of one and one half inches!
(I really don't mind that all theses layer on top of the old floors, I have plans of one day pulling it all up and restoring the wood floors, but in the mean time that is quite a ledge to whack ones foot on!)

 I bought at lest five different transitions. Mandy and I looked at every single one in every single store we happened to be in. I ordered from Amazon, but nothing worked. 
I finally gave in and moved on to how to make a layered transition look better. When we were looking at all the transitions I came across one that matched the tile perfectly. So I bought them and a length of simple ranch style window molding.

 The first step was of course cutting the wooden molding to fit and then painting it to match the metal transition strip. Then I drilled holes into the wood trim for the plastic screws of the metal strip. ( I was really excited to not have to drill into my hardwood floors!) Once everything looked good, I nailed the wood trim to the floors with a couple of trim nails.

 This nest step took a trial and error to get it right! The plastic screws needed to be trimmed so they could be pushed in to the right height. I happened to have a pair of tin snips handy and they worked perfectly! I then slid the plastic screws into the slot on the back of the metal transition (this worked a lot better then placing the screws in the hole and then trying to slide the strip on, which is how the directions told you to do it!).

I placed the metal strip over the wood trim and starting at one end, pushed the plastic screw into the holes. Sliding the screw along so the lined up with holes. Once all the screw were started in their proper holes, I took a hammer and pounded the strip into place. And just in case, I used a paint stirrer between the metal and the hammer so the paint wouldn't get dinged up!

And done! So much better! 
I am so glad I got this figured out. It was beginning to worry me! Now on to the next challenge!

What about you, an old house thrown you any mind benders?

16 Mayıs 2017 Salı

Caning Chair Seats

Caning Chair Seats

Chairs are at a premium when all the family is over, so with visits already planned for this summer, I knew it was time to get a couple of seats re-done.
Unfortunately, the blue side chairs with the covers I made to match the curtains haven't held up very good. but I had always planned on caning them once the covers gave out!

 This is a fairly easy project. I don't use any special tools, though there are plenty available.  An extra wide flat head screw driver, a utility knife and heavy duty scissors do the job just fine for me. The pre-woven caning I purchased from Rockler.
To start, you need a chair that is clean and has a groove around the center hole(if there are small holes around the center hole, it was caned by hand, not pre-woven caning). You will also need to soak the roll of caning and spline in water for at lest twelve hours. (Mine actually soaked for almost a week as I didn't get to it as soon as I thought I would!)

 Cut off a square of caning that will cover the center hole with plenty of extra around the edges. Trim to shape so it covers about 1/2" past the groove. To help make sure I put the caning in straight I lined up a row of caning along the edge of the center hole.

 Along the front edge, gently push the edges of the caning down into the groove with the flat head screwdriver. Check frequently to make sure the caning stays straight.

 Push the spline firmly into the groove working your way across the front.

 To get around the corner, while bending the spline, push it into the groove.

 Trim the caning if it looks like it will stick up beyond the spline.

 Continue poking the caning into the groove and pushing the spline down.

 Once you have worked your way up both side and around to the back, continue until the spline ends meet.

 Now all that is left is trimming the ends!

 Make sure you trim the spline so the ends are at lest touching or overlapping slightly. When the caning and spline dry it will shrink.

And that is it! One chair seat done!


 I am really liking the contrast of the natural caning with the blue, so I will probably just put a clear coat of shellac on it.

Another project crossed off the summer To-Do List!
What is on your list this summer?

27 Nisan 2012 Cuma

Day 5 of Knitting Blog Week

Day 5 of Knitting Blog Week


Day 5 Something A Bit Different
This is an experimental blogging day to try and push your creativity in blogging to the same level that you perhaps push your creativity in the items you create.There are no rules of a topic to blog about but this post should look at a different way to present content on your blog.

I am not sure if this qualifies as something different. But this is my first venture into making videos. And trying to find a place to post it.